When developing embedded-systems, initial development stages often involve huge number of "Modify-Build-Flash-Test" cycles. Test-Driven-Development methodology further promotes this style of development. This leads to a break in the "flow" at the Flash stage. Flashing the device with a newly built set of binaries interrupts the otherwise smooth "Modify-Build-Test" flow. Also errors tend to creep-in in the form of an older binary being copied/flashed, often causing confusion during debugging and endless grief to the developer.
A simple way to avoid this is to have the binaries on the host-machine (a PC) and boot the embedded device directly using those binaries. In case of Android embedded system development, these binaries are the Linux-Kernel and the Android filesystem image.
Pre-requisites:
- The embedded device
- A linux PC
- Ethernet connectivity between the two
NOTE: Below listed parts 1, 2 & 3 involve setting-up the "host" Linux PC. Part 4 describes configuring the device to boot directly using the binaries present on the "host". It is assumed that a functional bootloader (u-boot) is present on the device (internal-flash/mmc-card) and that ethernet-support(either direct or over usb) is enabled.
Part1: Linux kernel over tftp
host-PC$ sudo apt-get install xinetd tftpd tftp
2. Create /etc/xinetd.d/tftp
host-PC$ cat <<EOF | sudo tee /etc/xinetd.d/tftp
service tftp
{
    protocol        = udp
    port            = 69
    socket_type     = dgram
    wait            = yes
    user            = nobody
    server          = /usr/sbin/in.tftpd
    server_args     = /srv/tftp
    disable         = no
}
EOF
3. Make tftp-server directory
host-PC$ mkdir <tftp-server-path>


host-PC$ chmod -R 777 <tftp-server-path>


host-PC$ chown -R nobody <tftp-server-path>
4. Start tftpd through xinetd
host-PC$ sudo /etc/init.d/xinetd restart This concludes the tftp part of the setup process on the host.
Part2: Android fs over NFS
1. Install nfs packages
host-PC$ sudo apt-get install nfs-kernel-server nfs-common 2. Add this line to /etc/exports
<rootfs-path> *(rw,sync,no_subtree_check,no_root_squash) 3. Restart service
host-PC$ sudo service nfs-kernel-server restart 4. Update exports for the NFS server
host-PC$ exportfs -a 5. Check NFS server
host-PC$ showmount -e If everything went right, the <rootfs-path> will be listed in the output of showmount.
Part3: Where to put the files
1. Linux Kernel uImage
On the "host" PC,Copy the Linux-Kernel uImage into <tftp-server-path>
2. Android rootfs
On the "host" PC,Copy the contents of the Android rootfs into <rootfs-path>
Part4: Configuring the bootloader
1. Update bootargs
Connect the embedded device to the host-PC over ethernet (either directly or via a switch/router) and power it on. As shown below, configure the bootloader to pick-up the kernel from the host-PC over tftp and to mount the filesystem from the host-PC over NFS. As both support configuring a static-ip for the embedded-device or obtaining one dynamically using dhcp, 4 combinations are possible (2 shown below).nfs(static-ip) and tftp(dhcp)
U-Boot# setenv bootargs 'console=ttyO0,115200n8 androidboot.console=ttyO0 mem=256M root=/dev/nfs ip=<client-device-ip> nfsroot=<nfs-server-ip>:<rootfs-path> rootdelay=2'


U-Boot# setenv serverip 'host-pc-ip'


 U-Boot# bootm <Load address>
nfs(dhcp) and tftp(static-ip)
U-Boot# setenv bootargs 'console=ttyO0,115200n8 androidboot.console=ttyO0 mem=256M root=/dev/nfs ip=dhcp nfsroot=<nfs-server-ip>:<rootfs-path> rootdelay=2'


U-Boot# setenv serverip 'host-pc-ip'


U-Boot# setenv ipaddr 'client-device-ip'


U-Boot# tftp


U-Boot# bootm <Load address>
2. Boot ;-)
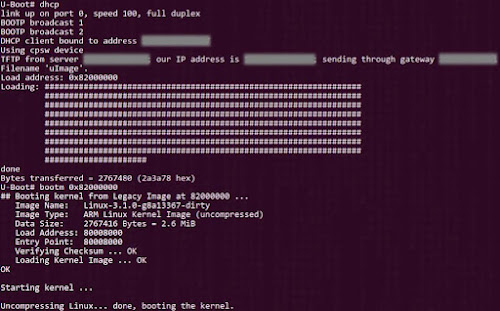
Linux-Kernel loaded over tftp


Awesome ! Thanks a lot
ReplyDeleteI am facing below error:
ReplyDelete================
Freeing unused kernel memory: 1024K (c1100000 - c1200000)
init: init first stage started!
audit: type=1403 audit(3005.970:2): policy loaded auid=4294967295 ses=4294967295
init: (Initializing SELinux non-enforcing took 0.10s.)
init: SELinux: Could not set context for /init: Operation not supported on transport endpoint
init: restorecon failed: Operation not supported on transport endpoint
init: Security failure; rebooting into recovery mode...
sysrq: SysRq : Emergency Remount R/O
Emergency Remount complete
I am also facing same issue, is issue fixed?
DeleteSorry, its been quite some time since i did this and newer version of Android appear to have complicated over time.
DeleteThe issue appears to be incompatibility between SELinux and the NFS-based root-fs.
Few things to try disabling SELinux.
Add either of these command-line options to the kernel bootargs in U-boot:
android.SElinux=disable
or
androidboot.selinux=permissive
Also add a suffix ",v3,tcp" (without the quotes) at the end of the value specified for the nfsroot property in the bootargs.
nfsroot=:,v3,tcp
I haven't been able to verify this myself. If this works for you, please feel free to drop a note here for others in future... :-)
On a related note, for anyone interested in what SELinux needs under the hood from a filesystem, here are a few slides describing what was done to add SELinux support to NFS - https://www.nsa.gov/Portals/70/documents/what-we-do/research/selinux/documentation/presentations/2005-implementing-selinux-support-for-nfs-presentation.pdf
Is this issue fixed. Can you please let us know the fix?
ReplyDelete