Search this blog...

Showing posts with label Android. Show all posts

Android Double-buffering, Page-Flip and HDMI

(a.k.a The case of the disappearing charging-icon)

The following is an account of the final development stages of an android phone, which for obvious reasons will not be named. The bug in itself was a very simple matter and the consequent fix too. But the entire process of discovering what exactly was happening was quite fun. (Ya right! tell that to my manager :P)

The android phone, i was working on, supported connecting an external-display/TV via MHL(Mobile-HD link i.e. HDMI-over-USB). Once connected, the entire UI would be displayed on the TV. The phone battery would also charge while connected.

The issue in question was initially raised as an application issue. It so happened that the charging status was not being displayed properly on the lockscreen. 

I. The issue...

With the device locked, when a external MHL-cable was connected to the android phone, it used to update the charging-icon. But if removed immediately, the charging-icon would continue to be displayed. This would not happen always. But sometimes even upto a minute after the cable was removed, the status would continue to be displayed as "charging".

The application developers banged their heads over the weekend and finally pushed the issue onto the underlying kernel drivers, stating that they were updating the charging-status as-&-when they get an update from the framework, which in turn depends on the fuelguage/battery-driver to obtain the battery-status.
 
It was now the kernel developers turn to use the "stress-reduction kit". After hours of logging almost every single instruction in every single interrupt routine, it was quite evident that the battery driver was not at fault. It was promptly reporting the connect/disconnect events when(and only when) an MHL cable was inserted/removed. The android framework was getting the events and eventually the lockscreen application too.

So now the question was that if EVERYTHING was working as it was supposed to, why the charging-status was not being displayed correctly?


II. The peculiar observation...

The peculiar thing about the disappearing charging-icon was that it was almost never for the same amount of time. Every time we tested it by plugging-in the cable, if it would disappear, it would do so for varying periods of time and then appear again onscreen.


III. What it meant...

We finally got onto the right track after we saw that the icon ALWAYS re-appeared onscreen just as the clock on the lock-screen updated itself. As it turned out the culprit was the display driver. When plugging in the MHL cable, there was some amount of tinkering going on in the background to handle the multiple displays and/or switch to the secondary(external HDTV over MHL)  from the primary(mobile-LCD). As is the norm, the display was double-buffered to improve performance and prevent onscreen flickering and tearing. Plugging-in the MHL-cable just as the display driver was initiating a swapbuffer() (i.e. a page-flip operation to pick the back-buffer to display onscreen) the device would then initiate another swapbuffer() which meant the stale buffer was displayed onscreen. to add to the misery the "smart" display driver was programmed to skip redundant swapbuffer() calls. i.e. unless the display contents had changed from the time the previous call to swapbuffer() it would not refresh the display unnecessarily. This meant that after plugging-in the MHL-cable, once the wrong screen (one without the chargin-icon) was displayed, it would not be refreshed unless something else changed onscreen.

Usually the onscreen clock forced a refresh of the buffers when the time was updated. As it showed time only down to the minute, it would mean that sometimes the display could be "stale" for as long as (but no longer than) a minute. An additional forced-refresh in the MHL-cable detection routine fixed the issue properly.

A simple example of double-buffering is shown below:


IV. Could Triple-buffering have prevented this issue?

Triple-buffering involves 2 back-buffers. at any given moment, the display-driver can immediately pick one that is not being updated by the graphics h/w to display into the front-buffer.
Triple buffering itself has 2 variants:
(A) Triple-buffering with no-sync. In this method the back-buffers are alternately updated by the graphics-h/w as fast as it can. At each Vsync, the display driver picks one of the buffers which is currently not being written to and swaps it with the front-buffer.

(B) Triple-buffering with Vsync. In this method, the back-buffers are updated by the graphics h/w as fast as it can. But the update stops if both the back-buffers are updated but have not been displayed in the front-buffer yet. The display-driver as usual swaps one of the back-buffers witht he fornt-buffer at each Vsync. at this point the previous front-buffer which is now a back buffer is considered "stale" and the graphics h/w fills it up with the updated frame.

Triple-bufffering used could potentially correct the issue as one of the back-buffers would hold the properly updated screen data and it even if it was not picked-up right away, it would be picked immediately in the following next swapbuffer() call. Also in double-buffering, the graphics h/w doesn't have to wait for access to the backbuffer till the swapbuffer() completes the flip operation between the front and back buffers. This is not the case in triple-buffering, thus allowing the graphics h/w to run at full throttle thereby reducing the time that either of the backbuffers contains stale display data.


Further reading: A detailed description of double/triple buffering.
Booting Android completely over ethernet

When developing embedded-systems, initial development stages often involve huge number of "Modify-Build-Flash-Test" cycles. Test-Driven-Development methodology further promotes this style of development. This leads to a break in the "flow" at the Flash stage. Flashing the device with a newly built set of binaries interrupts the otherwise smooth "Modify-Build-Test" flow. Also errors tend to creep-in in the form of an older binary being copied/flashed, often causing confusion during debugging and  endless grief to the developer.

A simple way to avoid this is to have the binaries on the host-machine (a PC) and boot the embedded device directly using those binaries. In case of Android embedded system development, these binaries are the Linux-Kernel and the Android filesystem image.

Pre-requisites:
  • The embedded device
  • A linux PC
  • Ethernet connectivity between the two

NOTE: Below listed parts 1, 2 & 3 involve setting-up the "host" Linux PC. Part 4 describes configuring the device to boot directly using the binaries present on the "host". It is assumed that a functional bootloader (u-boot) is present on the device (internal-flash/mmc-card) and that ethernet-support(either direct or over usb) is enabled.


Part1: Linux kernel over tftp

1. Install tftpd and related packages

host-PC$ sudo apt-get install xinetd tftpd tftp

2. Create /etc/xinetd.d/tftp

host-PC$ cat <<EOF | sudo tee /etc/xinetd.d/tftp
service tftp
{
    protocol        = udp
    port            = 69
    socket_type     = dgram
    wait            = yes
    user            = nobody
    server          = /usr/sbin/in.tftpd
    server_args     = /srv/tftp
    disable         = no
}
EOF

3. Make tftp-server directory

host-PC$ mkdir <tftp-server-path>

host-PC$ chmod -R 777 <tftp-server-path>

host-PC$ chown -R nobody <tftp-server-path>

4. Start tftpd through xinetd

host-PC$ sudo /etc/init.d/xinetd restart 
This concludes the tftp part of the setup process on the host.


Part2: Android fs over NFS

1. Install nfs packages

host-PC$ sudo apt-get install nfs-kernel-server nfs-common 

2. Add this line to /etc/exports

<rootfs-path> *(rw,sync,no_subtree_check,no_root_squash)

3. Restart service

host-PC$ sudo service nfs-kernel-server restart

4. Update exports for the NFS server

host-PC$ exportfs -a

5. Check NFS server

host-PC$ showmount -e

If everything went right, the <rootfs-path> will be listed in the output of showmount.


Part3: Where to put the files

1. Linux Kernel uImage

On the "host" PC,
Copy the Linux-Kernel uImage into <tftp-server-path>

    2. Android rootfs

    On the "host" PC,
    Copy the contents of the Android rootfs into <rootfs-path>


      Part4: Configuring the bootloader

      1. Update bootargs

      Connect the embedded device to the host-PC over ethernet (either directly or via a switch/router) and power it on. As shown below, configure the bootloader to pick-up the kernel from the host-PC over tftp and to mount the filesystem from the host-PC over NFS. As both support configuring a static-ip for the embedded-device or obtaining one dynamically using dhcp, 4 combinations are possible (2 shown below).

      nfs(static-ip) and tftp(dhcp)
      U-Boot# setenv bootargs 'console=ttyO0,115200n8 androidboot.console=ttyO0 mem=256M root=/dev/nfs ip=<client-device-ip> nfsroot=<nfs-server-ip>:<rootfs-path> rootdelay=2'

      U-Boot# setenv serverip 'host-pc-ip'

      U-Boot# bootm <Load address>


      nfs(dhcp) and tftp(static-ip)
      U-Boot# setenv bootargs 'console=ttyO0,115200n8 androidboot.console=ttyO0 mem=256M root=/dev/nfs ip=dhcp nfsroot=<nfs-server-ip>:<rootfs-path> rootdelay=2'

      U-Boot# setenv serverip 'host-pc-ip'

      U-Boot# setenv ipaddr 'client-device-ip'

      U-Boot# tftp

      U-Boot# bootm <Load address>


      2. Boot ;-)

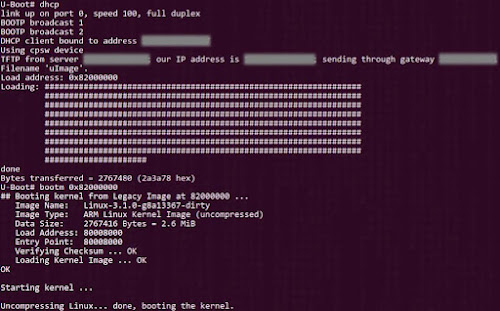
      Linux-Kernel loaded over tftp

      Filesystem mounted over NFS


      nGPS : Location fix without GPS

      NOTE: Skip this post if you do NOT live on planet earth.

      This is one of the ideas that i hit upon when preparing for a talk Sensors on Android @DroidCon2011. It is an unusual application of the on-board sensors present most Android devices. Due to lack of time i was unable to present it in much detail during my talk. So here goes...

      nGPS (NO GPS) is a way of obtaining a location fix without using any GPS, AGPS, Wi-Fi Positioning and cell-site triangulation technologies.

      Why would anyone want to use nGPS
      - Pure GPS based systems take upto 10mins for 1st fix.
      - AGPS, Wi-Fi positioning require an active data-connection.
      - Cell-site triangulation requires network coverage.

      So without any of these technologies at our disposal, how do we obtain a "location-fix" i.e. a latitude-longitude pair representing our current position. The answer lies in the magnetic-field sensor.

      The Earth's magnetic field, as measured by a magnetic sensor on the Earth's surface, is combination of of several magnetic fields generated by various sources. These fields interact with each other and the net resultant what the magnetic sensor measures. 
      World Magnetic Model (WMM)
      Major contributors to a magnetic-field: 
      + Conducting, fluid outer core.
      + Earth's crust and upper mantle.
      + Electrical currents in the atmosphere. 
      + Local magnetic interference.
      By filtering the local magnetic interference due to other electronic/electrical devices, we have a unique magnetic-field signature present at each place on earth. The WMM aims to provide an accurate estimate of this field. A device (having a magnetic sensor) can measure the components of this field. Then comparing it with the WMM values of the earth's field, one can identify the latitude/longitude of the present location.
      Android contains built-in support for the WMM using the GeomagneticField class. The GeomagneticField class utilises the WMM internally to provide an estimated magnetic field at any given point on Earth at a given time. The important thing to note is that this class accepts the location (alongwith altitude and time) and provides the expected magnetic-field at that position (at that particular altitude and instant of time).

      To determine the location using the GeomagneticField class, requires some reverse-lookup trickery on our part. More on it in another post.

      UPDATE : A recent talk on Sensors and Location based services on Android at blr-droid meetp#12 featuring nGPS among other things.

      Tonight's the night : ICS

      Two weeks after ICS was released, finally synced-up the entire source. 6GB.
      Gave a repo sync and woke-up and it was done! Sweet na?...

      A good thing with ICS is that pandaboard is supported as-is.
      This means that i can
      ...
      $ source build/envsetup.sh
      $ lunch full_panda-eng
      $ make -j4
      ...and i'm done! :-)
      And so i have. Estimating 4hrs for a build on my "old" pc.
      Tonight's the night... ;-)

      Sensors on Android @ DroidCon2011

      Here is the talk i presented @ DroidCon2011
       

      Download Sensors on Android @ DroidCon2011

      Gathered lots of inspiration talking (and listening) to several bright minds @DroidCon2011. Will be posting a "few" of them here. So subscribe to TheCodeArtist or take a quick peek here.

      Update:  Here is the complete video of the talk Sensors on Android at DroidCon-2011.


      Simulating keypress events on Android

      Modern day smart-phones have already begun to migrate from the traditional "a-button-for-every-need" approach to the "huge-display-cum-touchscreen" form-factors. Android phones  are no exception. But, traditional buttons are still reqd. for a few oft used functions (power,back,home,menu etc.) And smart-phones continue to have them alongwith the primary touch-based-UI.

      Android-OS provides a very easy method to simulate key/button press/release events via software. You might ask why do we need a software to generate the events when a hardware button is already present on the device. Here's why:
      • During development/testing of the button-drivers itself.
      • To implement automated rigorous tests. ( MonkeyTest? )
      • To implement/interface additional custom software keyboards.
      • Just because we can!
      The reason why i am doing it today is REASON NUMBER 4.

      Now, the basic goal of this exercise is extremely simple:
      Q. How to generate a hardware-button-press event
          WITHOUT actually pressing any key on the device?

      Proximity Sensor on Android Gingerbread

      The proximity sensor is common on most smart-phones, the ones that have a touchscreen. This is because the primary function of a proximity sensor is to disable accidental touch events. The most common scenario being- The ear coming in contact with the screen and generating touch events, while on a call.

      Sensors on Android Gingerbread

      Android 2.3 (codename Gingerbread) was officially released amidst huge hype and fanfare last week and BOY O BOY!!  people sure are queuing-up to have a peek. Sensors were the most hyped about sub-system.