Search this blog...

Showing posts with label CodeProject. Show all posts

Internet Radio : Part1 - Shoutcast Protocol

NOTE: If you spent the last decade 100miles below the surface of the earth studying the growth of algae under an antarctic glacier, then you will be surprised to learn that we can now listen to radio over the internet. Just like tuning-in to particular frequencies for particular stations in the olden days; now we can "tune-in" to specific radio stations over the internet. Without further ado, lets jump-in into the world of "Internet Radio".

Most apps claiming to support Internet Radio, in fact support a industry standard - Shoutcast. It was a protocol devised by nullsoft in the 90's and first implemented in their popular player Winamp(stop reading if you haven't heard of Winamp!). Inspite of being a proprietary protocol with not much documentation to go with, Shoutcast has become the de-facto industry standard for streaming audio. This is mainly due to its simplicity and similarity with the existing hyper-text transfer protocol (dear old http! wink wink). Icecast is a similar open-source implementation compatible with Shoutcast.

Initial handshake between Shoutcast client-server

High-level overview of Internet-radio over Shoutcast.

[STEP1] Station Listing

The client app connects to a station listing/aggregator on the internet and obtains a list of stations alongwith their details like genres, language, now-playing, bitrate among other things.

[STEP2] Station Lookup

The user can then select one of the stations as desired. Then the client obtains the ip-address(& port) of the server running that particular station from the station-listing/aggregator. Networking enthusiasts will notice that this step is exactly like a DNS lookup i.e. the client obtains the network address for a particular station name; the station-listing/aggregator acting like a DNS-server for Radio stations. Also note that sometimes the station-listing will provide only a domain-name and then an additional actual DNS lookup is needed to obtain the ip-address of the streaming server. Popular station-listing/aggregator sites like Xiph, Shoutcast.com and vTuner provide huge web-friendly lists of live radio stations.

[STEP3|4] Station Connection

1. The client attempts to connect to the server using the ip-address(and port) obtained during station lookup.
Connection request from shoutcast client (click to enlarge)

2. The server responds with "ICY 200 OK" (a custom 200 OK success code)...
ICY 200 OK reply from shoutcast server (click to enlarge)

3. ...and the stream header...
Shoutcast stream header (click to enlarge)

4. ..and finally the server starts sending encoded audio in a continuous stream of packets(which the client app can decode and playback) until the client disconnects(stops ACK-ing and signals a disconnect).
Encoded audio data stream (click to enlarge)
Download the entire WireShark capture of packets exchanged by the shoutcast client and server during initial station connection.

 The above steps are similar to what a browser does when it connects to a website (and hence in-browser streaming audio playback of shoutcast streams IS possible).

Shoutcast has subtle differences over http during the station connection step above. Shoutcast supports "Icy-MetaData" - an additonal field in the request header. When set, its a request to the shoutcast server to embed metadata about the stream at periodic intervals(once every "icy-metaint" bytes) in the encoded audio stream itself. The value of "icy-metaint" is decided by the shoutcast server configuration and is sent to the client as part of the initial reply.

Shoutcast stream format when ICY:MetaData is set to 1

This poses a slight complication during playback. If the received audio stream is directly queued for playback, then the embedded metadata appears as periodic glitches. Following is one such sample recording. This audio clip was retrieved from a radio stream whose icy:metaint = 32768; i.e. the metadata is embedded in the audio stream once every 32KBytes. Stream bit-rate is 4KBps. So during playback a glitch is present once every 32KB/4KB = 8seconds (0:08s, 0:16s, 0:24s, 0:32s,...).


To view/analyse the stream data in a hex editor, download the actual clip and check out the following offsets 
Update: Unfortunately the service i was using to host the audio clip has lost it and i was foolish enough to trust them and have no local backups. :(
R.I.P
Shoutcast-Metadata.mp3
2013-2014
Here lies a song, cut short in its prime...

[0:08s] 0x0815A - 0x0817A count N = 2, meta = 1+ (16 x 2) = 33(0x21h)bytes
[0:16s] 0x1017B - 0x1017B count N = 0, meta = 1byte
[0:24s] 0x1817C - 0x1817C count N = 0, meta = 1byte
[0:32s] 0x2017D - 0x2017D count N = 0, meta = 1byte

Embedded metadata from 0x0815A to 0x0817a.
Note the first byte is 02 i.e. metadata is 2x16=32(0x20h)bytes following it.

Also note that the first 345(0x159h)bytes of the clip are the reply header of the stream(plain-text in ASCII) sent by the shoutcast server. Technically these are NOT part of the audio stream as well.

NOTE: If you simply want to obtain the audio stream (no embedded metadata) then set the "Icy-MetaData" field in the request header to 0 or simply do NOT pass it as part of the initial request header.

Finally here is a small bit of code that implements all that we have learnt so far - a simple shoutcast client in a few lines of C, that connects to any shoutcast server and logs the audio stream data to stdout. It uses the curl library to initiate connection requests to the shoutcast server.

https://gist.github.com/TheCodeArtist/2f1b9fa68197e39ca9bc
Stripping off the comments and the clean-up code following line:50, it comes down to 13 lines of C code. Pretttty neat eh?...

Usage:
$> sudo apt-get install libcurl4-gnutls-dev
$> gcc simple.c -o simple -l libcurl
$> ./simple <shoutcast-server-ip-addr:port> > <test-file>

After running the above commands, the <test-file> will contain the audio stream of that particular internet radio station. The can be played back in any player that supports decoding the stream format(AAC, MP3, OGG etc. depending on the radio station) Make sure to comment out line 38 in simple.c to have a glitch-free(no embedded metadata) audio stream.

This concludes part 1 of the series on how internet radio works. In part2 we will analyse the challenges and issues faced during de-packetising, parsing and queuing the audio stream buffers for local playback. Stay tuned for updates.


HDD, FS, O_SYNC : Throughput vs. Integrity

Today we will spend some time over filesystems, block-devices, throughput and data-integrity. But first, a few "MYTHBUSTER" statements.
#1: Even the fastest HDD today can do ONLY 650KBps natively.

#2: O_SYNC on a filesystem does NOT guarantee a write to the HDD.

#3: Raw-I/O over BLOCK devices DOES guarantee data-integrity.

Hard to believe, right? Lets analyse these statements one by one...

The fastest Hard-disk drives today run at 10,000RPM (compared to regular ones at 5400,7200). Also the faster HDDs have transitioned to a 4096 byte internal block-size (compared to 512 bytes on regular ones).

Details of HDD components
To read/write one particular sector from/to the HDD, the head needs to be first aligned radially in the proper position. Next one waits as the rotating disk platter positions the desired sector under the disk-head. Now one is able read/write to the sector.

Unit of data on HDD = 1 sector =4096 bytes
MAX RPM = 10,000 = 10,000/60 = 166.667 rotations/second
Seek-time = 1/166.667 = 0.006s
Throughput = 4096/0.006 = 682666.667 ~ 650KBps

The above calculation assumes the worst possible values for both the I/O-size(1 sector) and seek-time(1 entire rotation). This condition though is quite easily seen in real life scenarios like database applications which use the HDD as a raw block-device.

Better speeds in the range of 20-50MBps are commonly obtained by a combination of several strategies like:
  • Multi-block I/O.
  • Native Command Queueing.
  • RAID stripping.
Now lets consider a regular I/O request at the HDD level:

HDD Read:

  1. The kernel raises a disk read request to the HDD.The HDD has a small amount of disk-cache (RAM) which it checks to see if the requested data exists.
  2. If NOT found in the disk-cache then the disk-head is moved to the data location on the platter.
  3. The data is read into disk-cache and a copy is returned to the kernel.

HDD Write:

  1. The kernel raises a disk write request to the HDD.
  2. The HDD has a small amount of cache (RAM) where the data to be written is placed.
  3. An on-board disk controller is in-charge of the saving the contents of the cache to the platter. It operates on the following set of rules:
  • [Rule1] Write cache to platter as soon as possible.
  • [Rule2] Re-order write operations in sequence of platter location.
  • [Rule3] Bunch several random writes together into one sequence.
"Hasta la vista, baby!"
HUD of the disk-IO firmware running on a T-800 Terminator ;-)
[Rule1] minimises data loss. As cache is volatile i.e. any power-outage will mean that data (in the HDD-cache), which is NOT yet written to the HDD-platter, is lost.

[Rule2] optimises the throughput. As serialising access reduces the time spent in seeking by the read-write head.

[Rule3] reduces power consumption, disk-wear by allowing the disk to be stopped from constantly spinning all the time. Only when the cache is filled to a certain limit the disk motor is powered on and the cache is flushed to the platter, following which the motor is powered-down again until the next cache flush.

Its obvious that [1] [2] [3] are counter-productive and the right balance needs to be struck between the three to have data-integrity, high-throughput, low-power-consumption & longer disk-life. Several complex algorithms have been devised to handle this in modern-day HDD controllers.

The problem though is that by default performance is sacrificed in favour of the other two. This is just a "default" setting though and the beauty of the Linux-Kernel being open-source is that one is free to stray from the "default" setting.

If you are doing mostly sequential raw block-I/O on a SATA HDD, you would be a prime candidate for this patch, which effectively moves the operation-point of the HDD closer to high-performance region in the map.
  

Moving on, we now focus on how the use of O_SYNC affects I/O on filesystems as well as the raw block device.


Regular write on a regular filesystem

fd = open("/media/mount1/file");
Consider the first case where one does a regular write(NO O_SYNC flag) on a regular filesystem on a HDD. The data is copied from the APP to the FS i.e. userspace-app(RAM) into the kernel filesystem page-cache(RAM) and control returns. During this, one does NOT cross any data-barriers and hence data is NOT guaranteed to be written to the HDD. This makes the entire process of a regular write on an fs extremely fast.

Synchronous write on a regular filesystem

fd = open("/media/mount1/file", O_SYNC);
The second case illustrated above depicts a synchronous write (with O_SYNC flag) on a regular filesystem on a HDD. The man page for open() call contains the following notes:
O_SYNC The file is opened for synchronous I/O. Any writes on the resulting file descriptor will block the calling process until the data has been physically written to the underlying hardware.

Although using O_SYNC looks like a sureshot guarantee that data is indeed written to disk, there lies a catch in the implementation. Most HDDs contain a on-board cache on the HDD itself. A write command to the disk transfers the data from the kernel filesystem page-cache(RAM) to the HDD-cache(not the actual mechanical platter of the disk.) This process is limited by the bus(SATA, IDE etc) which is faster than the actual mechanical platter. When a HDD receives a write command, it copies the data into its internal HDD-cache and returns immediately. The HDD's internal firmware later transfers the data to the disk-platter according to its "3 rules" as discussed previously. Thus a write to HDD does NOT necessarily imply a write to the disk platter. Hence even synchronous writes on a filsystem do NOT imply 100% data integrity.

Also a data-barrier exists along this path in the filesystem layer where metadata(inode,superblock) info is stored. This will help in identifying any data integrity on future access. Note that maintaining/updating inode,superblocks does NOT guarantee that the data is written to disk. Rather it makes the last sequence of writes atomic (i.e. all the writes get committed to disk or none). The inode,superblock info serves as a kind of checksum as they are updated accordingly following the atomic write operation. All this processing means that throughput incurs a slight penalty in this case.

Synchronous write on a block device

fd = open("/dev/sda", O_SYNC);
The third case illustrated above is a synchronous write to the HDD directly via its block-device(eg. /dev/sda). In this case there is NO data-barrier in the filesystem. The O_SYNC is implemented by using the data-barrier present in the HDD i.e. flushing  the disk-cache explicity to ensure that all the data is indeed transferred to the disk-platter before returning. This incurs the maximum penalty and hence the throughput is the slowest of all 3 scenarios above.

Salient observations:

  1. A data barrier is a module/function across which data integrity is guaranteed i.e if the function is called and it returns successfully, then the data is completely written to non-volatile memory(HDD, in this case). A data barrier introduces an order of magnitude change in:
    • Access-time (++)
    • Throughput  (--)
  2. A data barrier in the lower layers incurs a larger penalty than one in the upper layers. (Penalty : App < FS < Disk.)
  3. O_SYNC on HDD via filesystems does NOT guarantee a successful write to non-volatile disk-platter.
  4. O_SYNC on HDD via block-device directly guarantees data-integrity but offers very low throughput.
  5. The HDD data-barrier(FLUSH_CACHE) is NOT utilised when using regular filesystems to access the HDD.
  6. Disabling HDD data-barrier and raw DIRECT-I/O via the block device provides maximum throughput to a HDD.
fd = open("/dev/sda", O_SYNC|O_DIRECT);

SATA hotplug : Add/Remove sata HDD in a jiffy

Its not common knowledge that SATA HDDs are capable of being hot-plugged into almost any modern PC. However using them in a plug-n-play manner like portable external USB-HDDs is still not common.

Here is how to use your SATA HDD like an portable HDD.

Tested on:
- Ubuntu 11.10
- DELL Optiplex 380
- Seagate Barracuda 1TB (SATA).

1. Connect the SATA HDD to host PC. (sata-bus + power)


2. Scan for new devices on SCSI host

sudo echo "- - -" > /sys/class/scsi_host/hostN/scan
where N is the host port number on your host PC to which you have plugged-in the SATA HDD. Usually N=1, assuming the primary HDD on host PC is connected on SATA0.

"- - -" stands for wildcards in place of the
channel number, SCSI target ID, and LUN. More Info

3. Mount the newly detected device locally

sudo mount /dev/sdX /media/temphdd
where X is a/b/c/d etc. Usually X=b, assuming the primary HDD on host PC is enumerated as sda an there are no other block devices.

4. Copy all your data to/from the HDD present at /media/tempHDD.


5. Once finished, unmount the device

sudo umount /media/temphdd

6. Powering down the SATA HDD

sudo echo 1 > /sys/block/sdX/device/delete
Ensure that you refer to the proper device (sdb, sdc etc.) as above in step 3.

7. Disconnect the SATA HDD from host PC.

Thats it! Thats how one can use the hotplug feature of SATA HDDs to efectively use them as portable external HDDs.

5 ways to improve HDD speed on Linux

LINUX LINUX LINUX LINUX

(If you still think this post is about making windows load faster, then press ALT+F4 to continue)
Our dear Mr. Client


Its a fine sunny sunday morning. Due tomorrow, is your presentation to a client on improving disk-I/O. You pull yourself up by your boots and manage to climb out of bed and onto your favorite chair...
I think you forgot to wear your glasses...


Aahh thats better... You jump into the couch and turn on your laptop and launch (your favorite presentation app here). As you sip your morning coffee and wait for the app to load, you look out of the window and wonder what it could be doing.
Looks simple, right? Then why is it taking so long?

If you would be so kind enough to wipe your rose-coloured glasses clean, you would see that this is what is ACTUALLY happening

0. The app (running in RAM) decides that it wants to play spin-the-wheel with your hard-disk.

1. It initiates a disk-I/O request to read some data from the HDD to RAM(userspace).

2. The kernel does a quick check in its page-cache(again in RAM) to see if it has this data from any earlier request. Since you just switched-on your computer,...

3. ...the kernel did NOT find the requested data in the page-cache. "Sigh!" it says and starts its bike and begins it journey all the way to HDD-land. On its way, the kernel decides to call-up its old friend "HDD-cache" and tells him that he will be arriving shortly to collect a package of data from HDD-land. HDD-cache, the good-friend as always, tells the kernel not to worry and that everything will be ready by the time he arrives in HDD-land.

4. HDD-cache starts spinning the HDD-disk...

5. ...and locates and collects the data.

6. The kernel reaches HDD-land and picks-up the data package and starts back.

7. Once back home, it saves a copy of the package in its cache in case the app asks for it again. (Poor kernel has NO way of knowing that the app has no such plans).

8. The kernel gives the package of data to the app...

9. ...which promptly stores it in RAM(userspace).

Do keep in mind that this is how it works in case of extremely disciplined, well-behaved apps. At this point misbehaving apps tend to go -

"Yo kernel, ACTUALLY, i didn't allocate any RAM, i wanted to just see if the file existed. Now that i know it does, can you please send me this other file from some other corner of HDD-land."
...and the story continues...

Time to go refill your coffee-cup. Go go go...

Hmmm... you are back with some donuts too. Nice caching!

So as you sit there having coffee and donuts, you wonder how does one really improve the disk-I/O performance. Improving performance can mean different things to different people:

  1. Apps should NOT slow down waiting for data from disk.
  2. One disk-I/O-heavy app should NOT slow down another app's disk-I/O.
  3. Heavy disk-I/O should NOT cause increased cpu-usage.
  4. (Enter your client's requirement here)

So when the disk-I/O throughput is PATHETIC, what does one do?...
5 WAYS to optimise your HDD throughput!


1. Bypass page-cache for "read-once" data.

What exactly does page-cache do? It caches recently accessed pages from the HDD. Thus reducing seek-times for subsequent accesses to the same data. The key here being subsequent. The page-cache does NOT improve the performance the first time a page is accessed from the HDD. So if an app is going to read a file once and just once, then bypassing the page-cache is the better way to go. This is possible by using the O_DIRECT flag. This means that the kernel does NOT considered this particular data for the page-cache. Reducing cache-contention means that other pages (which wouold be accessed repeatedly) have a better chance of being retained in the page-cache. This improves the cache-hit ratio i.e better performance.

void ioReadOnceFile()
{
/*  Using direct_fd and direct_f bypasses kernel page-cache.

 *  - direct_fd is a low-level file descriptor
 *  - direct_f is a filestream similar to one returned by fopen()
 *  NOTE: Use getpagesize() for determining optimal sized buffers.
 */

int direct_fd = open("filename", O_DIRECT | O_RDWR);

FILE *direct_f = fdopen(direct_fd, "w+");

/* direct disk-I/O done HERE*/


fclose(f);

close(fd);
}


2. Bypass page-cache for large files.

Consider the case of a reading in a large file (ex: a database) made of a huge number of pages. Every subsequent page accessed get into the page-cache only to be dropped out later as more and more pages are read. This severely reduces the cache-hit ratio. In this case the page-cache does NOT provide any performance gains. Hence one would be better off bypassing the page-cache when accessing large files.

void ioLargeFile()
{
/*  Using direct_fd and direct_f bypasses kernel page-cache.

 *  - direct_fd is a low-level file descriptor
 *  - direct_f is a filestream similar to one returned by fopen()
 *  NOTE: Use getpagesize() for determining optimal sized buffers.
 */

int direct_fd = open("largefile.bin", O_DIRECT | O_RDWR | O_LARGEFILE);

FILE *direct_f = fdopen(direct_fd, "w+");

/* direct disk-I/O done HERE*/


fclose(f);

close(fd);
}


3. If (cpu-bound) then scheduler == no-op;

The io-scheduler optimises the order of I/O operations to be queued on to the HDD. As seek-time is the heaviest penalty on a HDD, most I/O schedulers attempt to minimise the seek-time. This is implemented as a variant of the elevator algorithm i.e. re-ordering the randomly ordered requests from numerous processes to the order in which the data is present on the HDD. require a significant amount of CPU-time.

Certain tasks that involve complex operations tend to be limited by how fast the cpu can process vast amounts of data. A complex I/O-scheduler running in the background can be consuming precious CPU cycles, thereby reducing the system performance. In this case, switching to a simpler algorithm like no-op reduces the CPU load and can improve system performance.
echo noop > /sys/block/<block-dev>/queue/scheduler


4. Block-size: Bigger is Better

Q. How will you move Mount Fuji to bangalore?
Ans. Bit by bit.
While this will eventually get the job done, its definitely NOT the most optimal way. From the kernel's perspective, the most optimal size for I/O requests is the the filesystem blocksize (i.e the page-size). As all I/O in the filesystem (and the kernel page-cache) is in terms of pages, it makes sense for the app to do transfers in multiples of pages-size too. Also with multi-segmented caches making their way into HDDs now, one would hugely benefit by doing I/O in multiples of block-size.
Barracuda 1TB HDD : Optimal I/O block size 2M (=4blocks)
The following command can be used to determine the optimal block-size
stat --printf="bs=%s optimal-bs=%S\n" --file-system /dev/<block-dev> 
 

5. SYNC vs. ASYNC (& read vs. write)

ASYNC I/O i.e. non-blocking mode is effectively faster with cache

When an app initiates a SYNC I/O read, the kernel queues a read operation for the data and returns only after the entire block of requested data is read back. During this period, the Kernel will mark the app's process as blocked for I/O. Other processes can utilise the CPU, resulting in a overall better performance for the system.

When an app initiates a SYNC I/O write, the kernel queues a write operation for the data puts the app's process in a blocked I/O. Unfortunately what this means is that the current app's process is blocked and cannot do any other processing (or I/O for that matter) until this write operation completes.

When an app initiates an ASYNC I/O read, the read() function usually returns after reading a subset of the large block of data. The app needs to repeatedly call read() with the size of data remaining to be read, until the entire required data is read-in. Each additional call to read introduces some overhead as it introduces a context-switch between the userspace and the kernel. Implementing a tight loop to repeatedly call read() wastes CPU cycles that other processes could have used. Hence one usually implements blocking using select() until the next read() returns non-zero bytes read-in. i.e the ASYNC is made to block just like the SYNC read does.

When an app initiates an ASYNC I/O write, the kernel updates the corresponding pages in the page-cache and marks them dirty. Then the control quickly returns to the app which can continue to run. The data is flushed to HDD later at a more optimal time(low cpu-load) in a more optimal way(sequentially bunched writes).

Hence, SYNC-reads and ASYNC-writes are generally a good way to go as they allow the kernel to optimise the order and timing of the underlying I/O requests.

There you go. I bet you now have quite a lot of things to say in your presentation about improving disk-IO. ;-)


PS: If your client fails to comprehend all this (just like when he saw inception for the first time), then do not despair. Ask him to go buy a freaking-fast SSD and he will never bother you again.

More on How data-barriers affect HDD Throughput and Data-integrity.

Android Double-buffering, Page-Flip and HDMI

(a.k.a The case of the disappearing charging-icon)

The following is an account of the final development stages of an android phone, which for obvious reasons will not be named. The bug in itself was a very simple matter and the consequent fix too. But the entire process of discovering what exactly was happening was quite fun. (Ya right! tell that to my manager :P)

The android phone, i was working on, supported connecting an external-display/TV via MHL(Mobile-HD link i.e. HDMI-over-USB). Once connected, the entire UI would be displayed on the TV. The phone battery would also charge while connected.

The issue in question was initially raised as an application issue. It so happened that the charging status was not being displayed properly on the lockscreen. 

I. The issue...

With the device locked, when a external MHL-cable was connected to the android phone, it used to update the charging-icon. But if removed immediately, the charging-icon would continue to be displayed. This would not happen always. But sometimes even upto a minute after the cable was removed, the status would continue to be displayed as "charging".

The application developers banged their heads over the weekend and finally pushed the issue onto the underlying kernel drivers, stating that they were updating the charging-status as-&-when they get an update from the framework, which in turn depends on the fuelguage/battery-driver to obtain the battery-status.
 
It was now the kernel developers turn to use the "stress-reduction kit". After hours of logging almost every single instruction in every single interrupt routine, it was quite evident that the battery driver was not at fault. It was promptly reporting the connect/disconnect events when(and only when) an MHL cable was inserted/removed. The android framework was getting the events and eventually the lockscreen application too.

So now the question was that if EVERYTHING was working as it was supposed to, why the charging-status was not being displayed correctly?


II. The peculiar observation...

The peculiar thing about the disappearing charging-icon was that it was almost never for the same amount of time. Every time we tested it by plugging-in the cable, if it would disappear, it would do so for varying periods of time and then appear again onscreen.


III. What it meant...

We finally got onto the right track after we saw that the icon ALWAYS re-appeared onscreen just as the clock on the lock-screen updated itself. As it turned out the culprit was the display driver. When plugging in the MHL cable, there was some amount of tinkering going on in the background to handle the multiple displays and/or switch to the secondary(external HDTV over MHL)  from the primary(mobile-LCD). As is the norm, the display was double-buffered to improve performance and prevent onscreen flickering and tearing. Plugging-in the MHL-cable just as the display driver was initiating a swapbuffer() (i.e. a page-flip operation to pick the back-buffer to display onscreen) the device would then initiate another swapbuffer() which meant the stale buffer was displayed onscreen. to add to the misery the "smart" display driver was programmed to skip redundant swapbuffer() calls. i.e. unless the display contents had changed from the time the previous call to swapbuffer() it would not refresh the display unnecessarily. This meant that after plugging-in the MHL-cable, once the wrong screen (one without the chargin-icon) was displayed, it would not be refreshed unless something else changed onscreen.

Usually the onscreen clock forced a refresh of the buffers when the time was updated. As it showed time only down to the minute, it would mean that sometimes the display could be "stale" for as long as (but no longer than) a minute. An additional forced-refresh in the MHL-cable detection routine fixed the issue properly.

A simple example of double-buffering is shown below:


IV. Could Triple-buffering have prevented this issue?

Triple-buffering involves 2 back-buffers. at any given moment, the display-driver can immediately pick one that is not being updated by the graphics h/w to display into the front-buffer.
Triple buffering itself has 2 variants:
(A) Triple-buffering with no-sync. In this method the back-buffers are alternately updated by the graphics-h/w as fast as it can. At each Vsync, the display driver picks one of the buffers which is currently not being written to and swaps it with the front-buffer.

(B) Triple-buffering with Vsync. In this method, the back-buffers are updated by the graphics h/w as fast as it can. But the update stops if both the back-buffers are updated but have not been displayed in the front-buffer yet. The display-driver as usual swaps one of the back-buffers witht he fornt-buffer at each Vsync. at this point the previous front-buffer which is now a back buffer is considered "stale" and the graphics h/w fills it up with the updated frame.

Triple-bufffering used could potentially correct the issue as one of the back-buffers would hold the properly updated screen data and it even if it was not picked-up right away, it would be picked immediately in the following next swapbuffer() call. Also in double-buffering, the graphics h/w doesn't have to wait for access to the backbuffer till the swapbuffer() completes the flip operation between the front and back buffers. This is not the case in triple-buffering, thus allowing the graphics h/w to run at full throttle thereby reducing the time that either of the backbuffers contains stale display data.


Further reading: A detailed description of double/triple buffering.

Booting Android completely over ethernet

When developing embedded-systems, initial development stages often involve huge number of "Modify-Build-Flash-Test" cycles. Test-Driven-Development methodology further promotes this style of development. This leads to a break in the "flow" at the Flash stage. Flashing the device with a newly built set of binaries interrupts the otherwise smooth "Modify-Build-Test" flow. Also errors tend to creep-in in the form of an older binary being copied/flashed, often causing confusion during debugging and  endless grief to the developer.

A simple way to avoid this is to have the binaries on the host-machine (a PC) and boot the embedded device directly using those binaries. In case of Android embedded system development, these binaries are the Linux-Kernel and the Android filesystem image.

Pre-requisites:
  • The embedded device
  • A linux PC
  • Ethernet connectivity between the two

NOTE: Below listed parts 1, 2 & 3 involve setting-up the "host" Linux PC. Part 4 describes configuring the device to boot directly using the binaries present on the "host". It is assumed that a functional bootloader (u-boot) is present on the device (internal-flash/mmc-card) and that ethernet-support(either direct or over usb) is enabled.


Part1: Linux kernel over tftp

1. Install tftpd and related packages

host-PC$ sudo apt-get install xinetd tftpd tftp

2. Create /etc/xinetd.d/tftp

host-PC$ cat <<EOF | sudo tee /etc/xinetd.d/tftp
service tftp
{
    protocol        = udp
    port            = 69
    socket_type     = dgram
    wait            = yes
    user            = nobody
    server          = /usr/sbin/in.tftpd
    server_args     = /srv/tftp
    disable         = no
}
EOF

3. Make tftp-server directory

host-PC$ mkdir <tftp-server-path>

host-PC$ chmod -R 777 <tftp-server-path>

host-PC$ chown -R nobody <tftp-server-path>

4. Start tftpd through xinetd

host-PC$ sudo /etc/init.d/xinetd restart 
This concludes the tftp part of the setup process on the host.


Part2: Android fs over NFS

1. Install nfs packages

host-PC$ sudo apt-get install nfs-kernel-server nfs-common 

2. Add this line to /etc/exports

<rootfs-path> *(rw,sync,no_subtree_check,no_root_squash)

3. Restart service

host-PC$ sudo service nfs-kernel-server restart

4. Update exports for the NFS server

host-PC$ exportfs -a

5. Check NFS server

host-PC$ showmount -e

If everything went right, the <rootfs-path> will be listed in the output of showmount.


Part3: Where to put the files

1. Linux Kernel uImage

On the "host" PC,
Copy the Linux-Kernel uImage into <tftp-server-path>

    2. Android rootfs

    On the "host" PC,
    Copy the contents of the Android rootfs into <rootfs-path>


      Part4: Configuring the bootloader

      1. Update bootargs

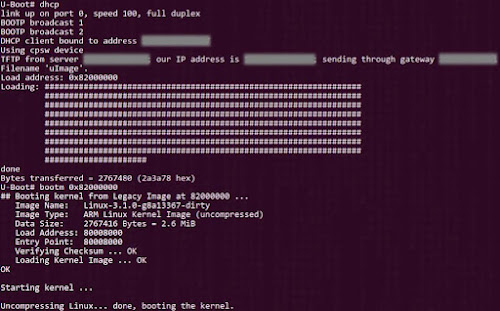
      Connect the embedded device to the host-PC over ethernet (either directly or via a switch/router) and power it on. As shown below, configure the bootloader to pick-up the kernel from the host-PC over tftp and to mount the filesystem from the host-PC over NFS. As both support configuring a static-ip for the embedded-device or obtaining one dynamically using dhcp, 4 combinations are possible (2 shown below).

      nfs(static-ip) and tftp(dhcp)
      U-Boot# setenv bootargs 'console=ttyO0,115200n8 androidboot.console=ttyO0 mem=256M root=/dev/nfs ip=<client-device-ip> nfsroot=<nfs-server-ip>:<rootfs-path> rootdelay=2'

      U-Boot# setenv serverip 'host-pc-ip'

      U-Boot# bootm <Load address>


      nfs(dhcp) and tftp(static-ip)
      U-Boot# setenv bootargs 'console=ttyO0,115200n8 androidboot.console=ttyO0 mem=256M root=/dev/nfs ip=dhcp nfsroot=<nfs-server-ip>:<rootfs-path> rootdelay=2'

      U-Boot# setenv serverip 'host-pc-ip'

      U-Boot# setenv ipaddr 'client-device-ip'

      U-Boot# tftp

      U-Boot# bootm <Load address>


      2. Boot ;-)

      Linux-Kernel loaded over tftp

      Filesystem mounted over NFS


      Why __read_mostly does NOT work as it should

      In modern SMP(multicore) systems, any processor can write to a memory location. The other processors have to update their caches immediately. For that reason, SMP systems implement the concept of "cacheline bouncing" to move "ownership" of cached-data between cores. This is effective but expensive.

      Individual cores have private L1 caches which are extremely faster than the L2 and L3 caches which are shared between multiple cores. Typically, when a memory location is going to be ONLY read repeatedly, but never written to (for example a variable tagged with the const modifier), each core on the SMP system can safely store its own copy of that variable in its private(non-shared) cache. As the variable is NEVER written, the cache-entry never gets invalidated or "dirty". Hence the cores never need to get into "cache line bouncing" for that variable.

      Take the case of the x86 architecture,

      An Intel core i5 die showing the various caches present
      • [NON-SMP] Intel Pentium 4 processor has to communicate between threads over the front-side bus, thus requiring at least a 400-500 cycle delay.
      • [SMP] Intel Core processor family allowed for communication over a shared L2 cache with a delay of only 20 cycles between pairs of cores and the front-side bus between multiple pairs on a quad-core design.
      • [SMP] The use of a shared L3 cache in the Intel Core i7 processor means that going across a bus to synchronize with another core is NEVER required unless a multiple-socket system is being used.
      The copies of "read-only" locations usually end-up being cached in the private caches of the individual cores, which are several orders of magnitude faster than the shared L3 cache.


      How __read_mostly is supposed to work: 
      When a variable is tagged with the __read_mostly annotation, it is a signal to the compiler that accesses to the variable will be mostly reads and rarely(but NOT never) a write.

      All variables tagged __read_mostly are grouped together into a single section in the final executable. This is to improve performance by allowing the system to optimise access time to those variables in SMP systems by allowing each core to maintain its own copy of them variable in it local cache. Once in a while when the variable does get written to, "cacheline bouncing" takes place. But this is  acceptable as the the time spent by the cores constantly synchronising using locks and using the slower shared-cache would be far more than the time it takes for the multiple cores to operate on own copies in their independent caches.

      What actually happens:
      (NOTE: In the following section, "elements" refers to memory blocks which are are smaller than a single cache-line and are so sparse in main-memory that a single cache-line cannot contain them both simultaneously.)
      The problem with the above approach is that once all the __read_mostly variables are grouped into one section, the remaining "non-read-mostly" variables end-up  together too. This increases the chances that two frequently used elements (in the "non-read-mostly" region) will end-up competing for the same position (or cache-line, the basic fixed-sized block for memory<-->cache transfers) in the cache. Thus frequent accesses will cause excessive cache thrashing on that particular cache-line thereby degrading the overall system performance.

      This situation is slightly alleviated by the fact that modern cpu caches are mostly 8way or 16way set-associative. In a 16way associative cache, each element has a choice of 16 different cache-slots. This means that two very frequently accessed elements, though closely located in memory, can still end-up in 2 different slots in the cache, thereby preventing cache-thrashing (which would have occurred had both continued competing for the same cache-line slot). In other words a minimum of 17 elements frequently accessed and closely located in memory are required for 2 of them to begin competing for a common cache-line slot.

      While this is true in the case of INTEL and its x86 architecture, ARM still sticks to 4way & 2way set-associative caches even in its Cortex A8, which means that just 3 or 5 closely located, frequently accessed elements can result in cache-thrashing on an ARM system. (Update: "Anonymous" rightly points out in the comments that 16-way set associative caches have made their way into modern SoCs, ARM Cortex A9 onwards.)

      kernel/arch/x86/include/asm/cache.h contains
      #define __read_mostly __attribute__((__section__(".data..read_mostly")))
      kernel/arch/arm/include/asm/cache.h: does NOT, thereby defaulting to the empty definition in
      kernel/include/linux/cache.h
      #ifndef __read_mostly
      #define __read_mostly
      #endif


      UPDATE: The patch daf8741675562197d4fb4c4e9d773f53494203a5 enables support for __read_mostly  in the linux kernel for ARM architecture as well.

      The reason for this? It turns out that most modern ARM SoCs have started using 8/16-way set associative caches. For example, the ARM PL310 cache controller (as "Anonymous" rightly points out in the comments) available on the ARM Cortex-A9 supports 16-way set associativity. The above patch now makes sense on modern ARM SoCs as the probability of cache-thrashing is reduced by the larger "N" in the N-way associative caches.

      With the number of cores increasing rapidly and the on-die cache size growing slowly, one must always aim to:
      • Minimise access to the last level of shared cache to improve performance on multicore systems.
      • Increase associativity of private caches (of individual cores) to eliminate cache-slot contention and reduce cache-thrashing.

      Simulating keypress events on Android

      Modern day smart-phones have already begun to migrate from the traditional "a-button-for-every-need" approach to the "huge-display-cum-touchscreen" form-factors. Android phones  are no exception. But, traditional buttons are still reqd. for a few oft used functions (power,back,home,menu etc.) And smart-phones continue to have them alongwith the primary touch-based-UI.

      Android-OS provides a very easy method to simulate key/button press/release events via software. You might ask why do we need a software to generate the events when a hardware button is already present on the device. Here's why:
      • During development/testing of the button-drivers itself.
      • To implement automated rigorous tests. ( MonkeyTest? )
      • To implement/interface additional custom software keyboards.
      • Just because we can!
      The reason why i am doing it today is REASON NUMBER 4.

      Now, the basic goal of this exercise is extremely simple:
      Q. How to generate a hardware-button-press event
          WITHOUT actually pressing any key on the device?

      Proximity Sensor on Android Gingerbread

      The proximity sensor is common on most smart-phones, the ones that have a touchscreen. This is because the primary function of a proximity sensor is to disable accidental touch events. The most common scenario being- The ear coming in contact with the screen and generating touch events, while on a call.